ORA
ORA makes research easier when using online repositories including Ancestry, FamilySearch, and others.
ORA combines a Windows program with a web browser extension to extract data and streamline your use of popular genealogy services. The browser extension is available for Chrome, Edge, Firefox, and Opera.
ORA is sold as a subscription service, $24 USD per year. You may purchase it here.
To move forward through this slideshow, press the right-arrow key or click the arrow in the lower-right of the window.
See the help pages for more information.
By the way, it's pronounced "aura".
ORA saves you time.
- ORA adds an OraPanel in your browser window when you are visiting online repositories like Ancestry, FamilySearch, and others.
- ORA helps you track your usage of records in the collections of the repository.
- ORA helps you extract data from the records you find and supports templates to customize data entry for both data records and citations.
Table of Contents
- Terminology
- Videos
- OraPanel
- Record Status
- Extract Data
- Search Targets
- Templates
- Requirements
- How to Buy
This is an introduction to ORA. For more information, see the help pages.
Terminology
ORA enhances online repositories including Ancestry, FamilySearch, and FindMyPast. ORA has a custom service for each of those repositories and several more.
Many repositories include more than one collection. For example, Ancestry.com has thousands of collections. An example is the 1880 United States Federal Census.
ORA includes a Generic Service you can assign to any web sites that are not covered by an ORA custom service.
The Generic Service divides sites by hostname and each hostname is treated as a collection. Hostnames are created from domain names where the domain "www.example.com" has the hostname "example.com".
Videos
If you'd like to see ORA in action, watch the videos above. Use the down arrow to browse the video pages in the sequence shown above.
OraPanel
When you open detail pages in a supported repository, ORA displays the OraPanel.
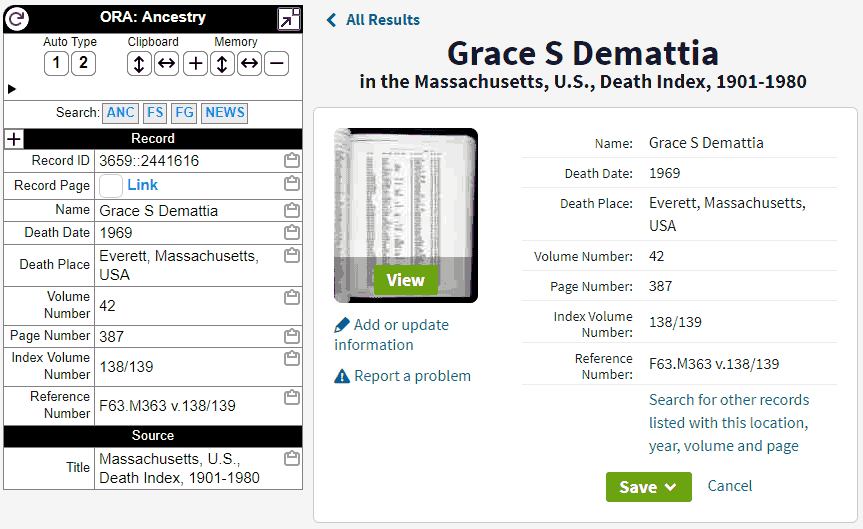
Example OraPanel
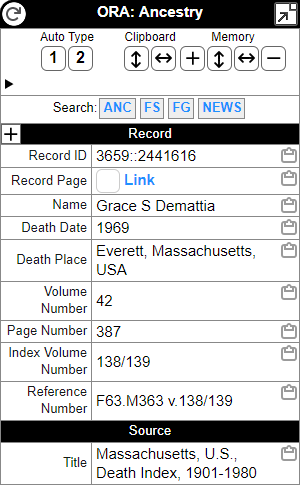
- ORA extracts record data from the current page and creates a row with a label and value for each data field it finds.
- Details are often located in multiple places on the page. ORA finds them.
- Date values are converted to your preferred format where the choices reflect standard genealogical practices.
- Some labels are converted to standard values. Standardizing labels helps when comparing fields from different collections.
- You may edit the field values to correct errors by clicking on the field while holding the Alt key.
Style
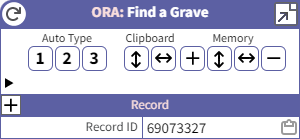
The OraPanel is styled to match the current repository. This is an example showing the top-portion of the OraPanel for Find a Grave.
General Controls
The icon in the upper-left will refresh the OraPanel. If the page contents change and ORA does not detect it, you an use the refresh icon to force ORA to reprocess the page.
The icon in the upper-right will expand or collapse the OraPanel. Clicking the icon toggles between collapsing the OraPanel to show only its title bar and expanding the OraPanel to show its full contents.
Extract Controls
You can copy any field value by clicking its clipboard icon. You do not have to select the text.
This small advantage will save time and help you avoid copy/paste errors.
Extract Controls (continued)
The OraPanel includes three sets of controls for copying data.
See the Extract Data section to learn more about these controls.
Moving the OraPanel
To move the OraPanel, click on its title bar and drag it to a new location.
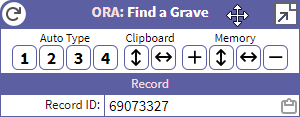
When the mouse cursor changes to the "move cursor" shape, click the left mouse button and drag the OraPanel to a new location. ORA will save the location and re-open the OraPanel there whenever you open a page in the current repository.
Record Status
- When reviewing search results, do you ever open the same page more than once because you forgot you already reviewed it?
- When searching a collection you have searched in the past, do you ever forget which records you have processed and open a record only to discover you already reviewed and rejected it in the past?
- Do you ever make a mental note to return to a record of interest that doesn't apply to your current search, and then forget to go back, or forget how to find it again?
ORA can help.
Record Status Icons
You may assign one of these icons to any record that you review:
| Not reviewed | |
| Accepted / Entered | |
| Skipped | |
| Questionable (Might Apply) | |
| Pending | |
| Rejected |
Assign Record Status
You click the status icon to update the status of a record.

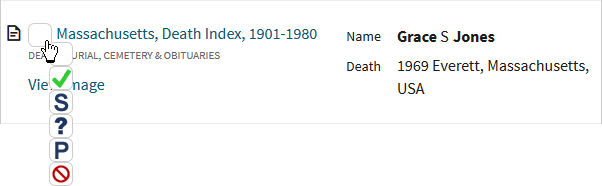

After assigning a Record Status icon, the icon appears next to links to that record in all search result lists and record detail pages.
Questionable and Pending Records
You can open a list of records that you mark Questionable or Pending so you can easily return to those entries.
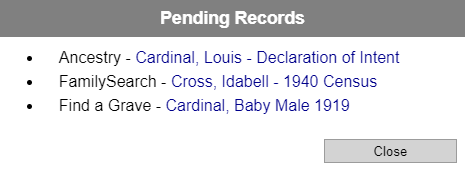
Each entry includes the name of the repository and a link to the record. You set the link text when you mark the record as Pending or Questionable.
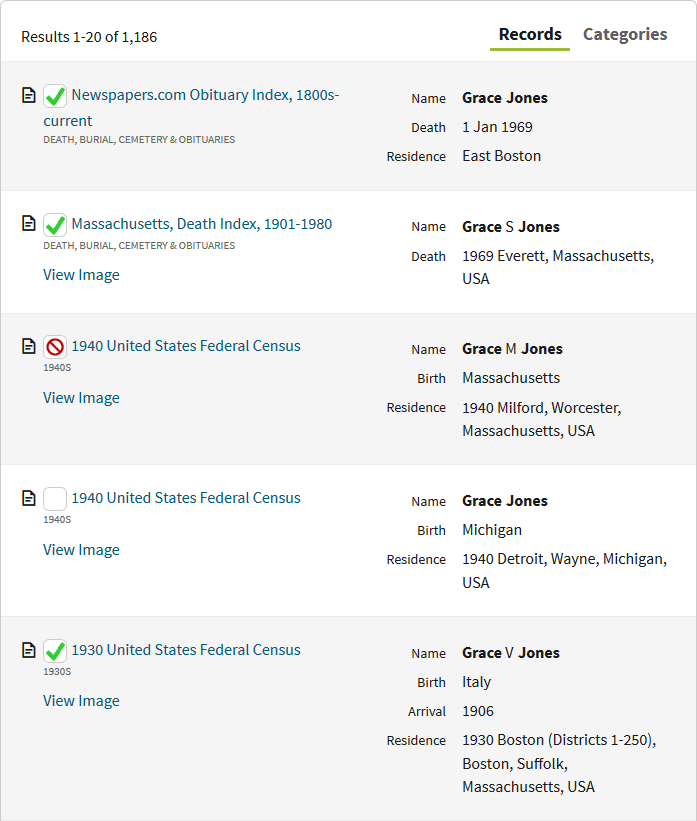
Record Status Icons in a Result List
Record Status icons appear in search result lists for the supported repositories so you can easily see which records you have already reviewed.
Extract Data
The OraPanel includes three sets of controls for copying data.
Each set is described on the following slides.
Clipboard
The Clipboard controls copy the current record's fields to the clipboard.
| Copy the current record to the clipboard. Each field gets a row with two cells, label and value. | |
| Copy the current record to the clipboard. Each field gets a column with two cells, label and value. |
Memory
With the Memory controls, you can copy multiple records and then paste them with one paste command. ORA uses the field labels to align data in rows and columns.
| Add a record to memory. Each record you add will be included in the set copied by one of the Memory copy buttons. | |
| Copy all the records in memory to the clipboard. Each record gets a column, and each field value gets a row. | |
| Copy all the records in memory to the clipboard. Each record gets a row, and each field value gets a column. | |
| Clears all records from memory. |
Use the down arrow to learn more about the Memory copy/paste feature.
Memory Copy Example #1
Assume you want to review the records for three people from the same census.
- Open the record page for person #1 and press the button in the Memory section.
- Repeat step #1 for person #2 and person #3.
- Press the button in the Memory section of the OraPanel.
- Open Excel or another spreadsheet program and paste the results into a new sheet.
See the next slide for example results.
Memory Copy Example #1
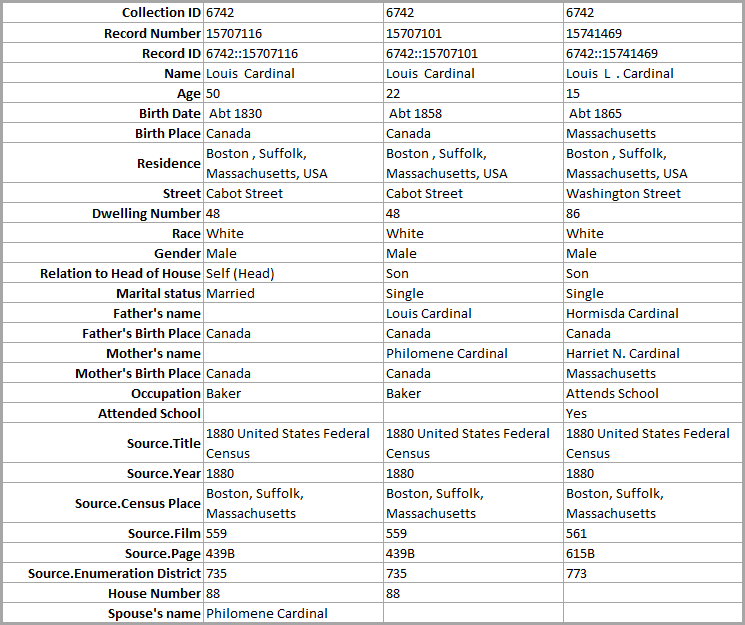
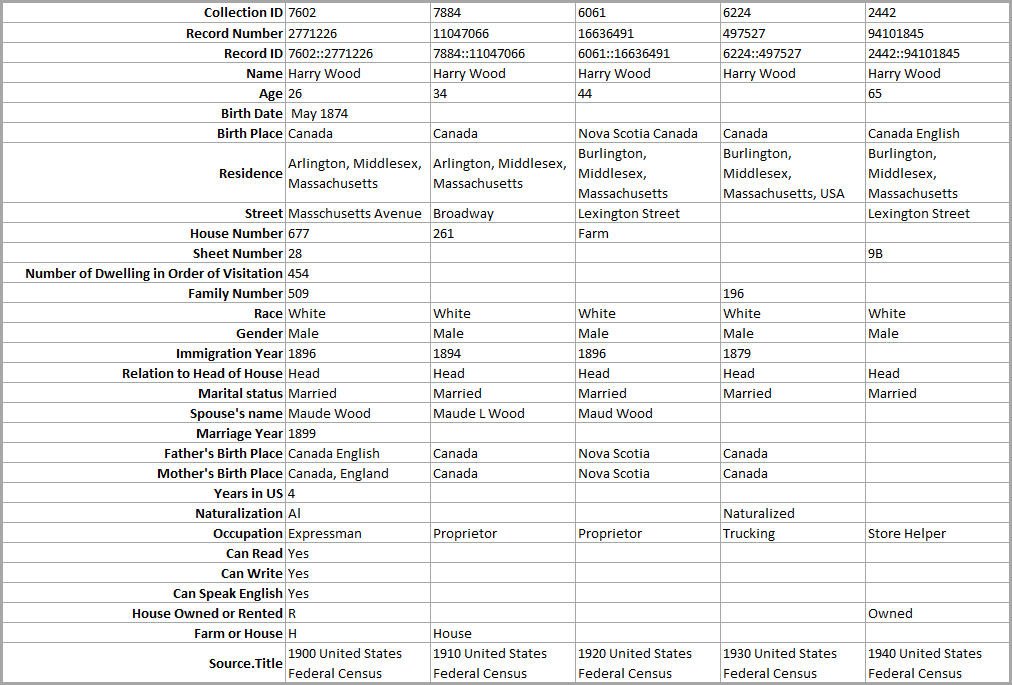
Memory Copy Example #2
This time, we'll copy data for the same person from four different census years.
As in example #1, use the button in the Memory section for each of the census records, then use the button in the Memory section to copy the data to the clipboard. Lastly, paste into Excel.
See the next slide for example results.
Memory Copy Example #2
Clipboard, Memory, and the Alt Key
If you hold the Alt key when clicking one of the "copy to clipboard" buttons, ORA will include some extra fields in the data copied to the clipboard. The extra fields are usually not useful for analysis. ORA creates the values for possible use with the Auto Type feature.
The two most common hidden values are "Page.Title" and "Page.URL". There are usually better values included in the visible fields for those two values. For example, the visible "URL" value is the best URL ORA can find. In many cases, it will be better than the actual URL used by the browser to fetch the current page. However, if you want the actual URL of the page included when copying all the fields, hold the [Alt] key when clicking the copy button.
The Alt key does not alter the functionality of the clipboard icons included next to each field value.
Search Targets
Search Targets help you search other repositories using the fields shown in the OraPanel.
You may enable multiple Search Targets making it possible to search one or more of your favorite repositories when viewing any record you find on the web.
You enable Search Targets so they are eligible to appear in the OraPanel. When ORA finds the minimum information required to do a search on the target repository, it adds a button to the OraPanel. Each enabled Search Target will have its own button in the OraPanel.
ORA includes several predefined Search Targets. They are disabled by default, but you may enable them. You may also define your own.
Templates
ORA templates are similar to templates used in Family Historian, RootsMagic, Legacy, TMG, and other applications to construct text for events and citations. Templates combine text with references to values from the current record and are intended to help you create text values that you copy and paste into your genealogy application.
ORA supports two template types for each collection.
Text Templates may be used to create citation text or some other combination of field values that you want to paste into your genealogy application.
Auto Type Templates combine field values with control sequences to automate a data entry sequence into your genealogy application.
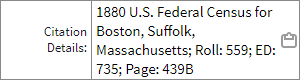
Text Template Example
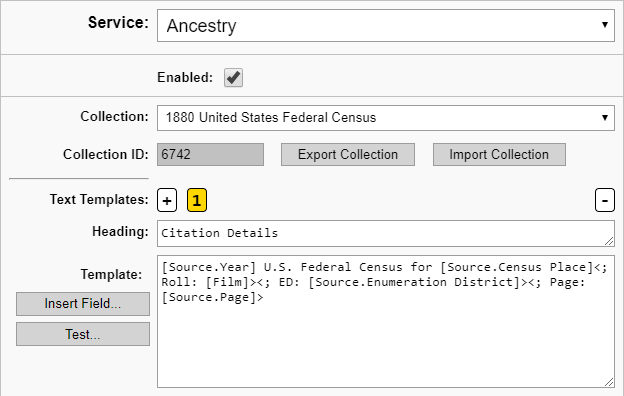
The Text Template above will add the following row to the OraPanel for records in Ancestry's 1880 United States Federal Census collection.
Auto Type
Auto Type Templates automate data entry by sending text extracted from a record to the current window in your preferred genealogy application.
There may be one or more buttons depending on the number of Auto Type templates you define. Each numbered button copies text to the application defined as the Target Application on the ORA Settings page.
Use the down arrow to learn more about the Auto Type function and its templates.
Auto Type Template
ORA constructs the text and controls sent to the target application using one of the Auto Type Templates for the current record collection.
Here's an example Auto Type Template for Find a Grave:
[Name]{TAB}[Cemetery Name]{TAB}[City]<, [County]><, [State]>{TAB}[Record ID]
That's a relatively simple template that copies text into four input fields in the target application. The {TAB} control sequence moves the text cursor to the next input field.
Advanced templates can control the target application by opening windows and performing other operations.
It up to you to create templates to suit your source recording standards and conventions, and for the services and collections you use. A few minutes invested in writing a template may save hours of time processing records for a collection.
Template Variable Reference
[Name]{TAB}[Cemetery Name]{TAB}[City]<, [County]><, [State]>{TAB}[Record ID]
[Name] is an example of a variable reference. A variable reference starts with "[" and ends with "]". The text inside must match the label of one of the fields in the OraPanel. ORA substitutes the value of the field into the output in place of the variable reference.
Template Control Sequence
[Name]{TAB}[Cemetery Name]{TAB}[City]<, [County]><, [State]>{TAB}[Record ID]
{TAB} is an example of a control sequence. A control sequence starts with "{" and ends with "}". The text inside must be one or more control sequence keywords. You may combine control sequence keywords using "+".
Templates can include all the special keys on a keyboard including {ALT}, {CTRL}, {ENTER}, {SHIFT}, {TAB}, and all function keys ({F1}, etc.).
ORA knows which keys are combined with other keys. For example, when a template contains {ALT+S} ORA sends the same events as if you had pressed ALT and S at the same time.
You may introduce delays into the sequence by indicating the length of the delay in milliseconds. For example, {1000} will delay for a full second, and {500} will delay for a half second. Delays give the target application time to respond to the prior text or control sequence.
Caution!
You may overwhelm an application when you send text to it. Applications expect typing to occur at human speeds, and they may perform a lot of processing on each keystroke if they are updating other controls or other windows as you type.
Before using an Auto Type Template, perform the keyboard input manually and watch for changes outside the textbox where you are typing. If the contents change, you should add delays into the Auto Type Template to avoid crashing the target application.
Auto Type Example Video
Watch the video on the next slide to see an example of ORA sending text to RootsMagic to create a citation.
Please note that the links shown in the video are not correct. The video will be updated soon to reflect the actual URLs.
Template Details
Here's the actual template used in the example.
{ALT+S}{ALT+C}findagrave{ENTER}{500}[Name]{TAB}[Cemetery Name]{TAB}
[City]<, [County]><, [State]>{TAB}[Record ID]{TAB}[Plot]
{ALT+S}is the same as pressing the ALT and S keys. In the person record window and with an event selected, that's the same as pressing the "Sources" button to open the Sources window.{ALT+C}is the same as pressing the ALT and C keys to press the "Cite existing source" button to open the Master Source List window.- RootsMagic uses the
findagravetext to search the source list. {ENTER}is the Enter key which selects the source that matches that name, and opens the "Edit Source" window.{500}gives RootsMagic half a second to open the "Edit Source" window.- The remaining elements in the template enter data in the input fields I defined for the Find a Grave source. The
{TAB}controls advance to the next text field.
The ORA Settings Page
- Settings Export / Import – It's important to backup your settings. Settings include Text Templates and Auto Type Templates and all your record status values.
- Target Application for Auto Type – Choose the application that will receive automated typing sequences from the Auto Type feature.
- Text Templates and Auto Type Templates – Define Text Templates and Auto Type Templates by collection within service.
- Pending and Questionable Record Lists – Open a list of records marked either "Pending" or "Questionable" with links to navigate directly to the record in the associated repository.
Requirements
- ORA is available on Windows 10 and Windows 11 only. ORA relies on a host component that runs outside the browser and that component is currently only available on Windows. ORA has also been used successfully under Windows 7.
- ORA requires the desktop version of .NET Core 3.1.
- ORA is designed to work in the Chrome, Edge, Firefox, and Opera browsers.
- Settings are not shared across browsers. ORA assumes that most users have a favorite browser and use that browser while doing online research. You may use the Setting Export / Import feature to manually move settings (templates and record status values) between browsers.
How to Buy ORA
- ORA is sold as a subscription service, $24 USD per year. You may purchase it here.
- After purchasing a license, wait for your license information to arrive via email then follow the instructions on the Installation help page.