If the OraSettings page shows an "ORA is not available" message when you open it, please wait a moment and then press F5 to refresh the page. After a change in 2022, browser's now take extra time when loading the ORA extension. if the "ORA is not available" message persists, follow the advice on the page to diagnose the issue.
Overview
Use OraSettings to configure ORA. Open OraSettings by clicking the ORA icon in the upper-right corner of your browser.
Some browsers will not show icons for some extensions unless you click an icon to show all extension icons. If the ORA icon does not appear in the upper-right of your browser, I recommend that you click the all-extensions icon and then choose the option to pin the ORA icon so it always appears.
Export, Import, Collection Report, and Record Status Buttons
There are five buttons in the top section of the OraSettings page.

Each button is explained below.
Export Settings
Use the [Export Settings] button to save your ORA settings and usage data to an external file. Files are saved with the file type ".ora-settings". The default location for export files is the Documents\ORA\Settings folder.
You should use the [Export Settings] button frequently to avoid losing data.
Import Settings
Use the [Import Settings] button to load ORA settings and usage data from an external file. When you import a file, ORA imports whatever is in the input file, adding new items and replacing any items that are in both the import dataset and the existing dataset.
Collection Report
Use the [Collection Report] button to open a report that shows all templates for all collections. The report is an HTML page that will open in the browser assigned to ".html" files, which may or may not be the browser you are using when you click the button.
The report includes a section for each repository, and within each repository, a sub-section for each collection.
If you hover your mouse over a collection name, a tooltip will appear that includes the repository name.
Storage Report
Use the [Storage Report] button to open a report of ORA database statistics. The report shows counts by record type, including Collection Names, Collection Templates, Record Status Items, and other details.
Counters
- Collection Field Sets - The number of collections where ORA has saved Field values for use when testing templates.
- Collection Names - The number of collections where ORA has saved the collection name.
- Collection Properties - The number of collection properties. Collection properties include several collection-specific settings, such as Parent Collection assignment and left-padding enabled/disabled.
- Collection Templates, Auto Type - The number of Auto Type Templates.
- Collection Templates, Text - The number of Text Templates
- Collections w/Templates or Properties - The number of collections that have one or more of collection properties, Auto Type Templates, or Text Templates.
- Host Names - The number of host name entries. ORA keeps track of the last host name you used to visit repositories that have (or may have) more than one host name. For example, "ancestry.com" and "ancestry.co.uk" are two host names for Ancestry.
- Library Templates - The number of Library Templates.
- Preferences - The number of preference records, such as preferences for the Target Application, date formats, etc.
- Record Status Comments - The number of records used to store comments for Pending and Questionable records.
- Record Status Items - The number of records used to store Record Status values.
- Saved Panel Locations - The number of records used to store OraPanel coordinates.
- Search Targets, Disabled - The number of disabled Search Targets.
- Search Targets, Enabled - The number of enabled Search Targets.
Show Pending Records
Use the [Show Pending Records] button to open a panel that contains a list of links to records you have marked "pending" ("P"). Each entry in the list includes the repository name and the comment you entered when setting the record status. If you left the comment field empty, the link will use the Record Id for the record as the link text.
Clicking the link will open the record in a new tab or window.
Show Questionable Records
Use the [Show Questionable Records] button to open a panel that contains a list of links to records you have marked "questionable" ("Q"). Each entry in the list includes the repository name and the comment you entered when setting the record status. If you left the comment field empty, the link will use the Record Id for the record as the link text.
Clicking the link will open the record in a new tab or window.
Auto Type

The Auto Type section includes properties related to the Auto Type feature.
Target Application
Use the Target Application pull-down menu to choose which application will receive the input data you send with Auto Type. The menu includes popular genealogy applications as well as some text editors and word processors. The text editors and word processors are included mostly for testing Auto Type templates, but you may have a use for them as part of your genealogical research process.
| Application | AppName |
|---|
The AppNames shown here may work with versions of the programs other than the ones listed above. The AppName values were discovered using the given application version, but other versions were not tested.
For Ancestris, the AppName is "javaw", but that will be the value for any Java-based application running under Windows. When ORA sees the ":Ancestris" parameter, it knows to search for the application with the Appname "javaw" and with "Ancestris" in the title.
If your genealogy application is not included in the Target Application pull-down menu, you have two choices:
- Add the
{TARGET=appname}Control Sequence to specify the target explicitly in each Auto Type Template. You can determine the proper appname for the{TARGET=appname}Control Sequence via Show Current Targets button. With your genealogy application running, use the Show Current Targets button to determine its target value. - Set the Target Application to Top-Most Window and then make sure that your genealogy application is the top window behind your browser.
Using Top-Most Window
If the desired Auto Type target application is not included in the Target Application pull-down menu, you may select the "Top-Most Window" entry. When using "Top-Most Window", switch from your browser to the target application before using Auto Type, and then switch back to your browser. That will position your genealogy application as the top-most window other than the browser. When you click an Auto Type button, ORA will switch to the top-most window other than the browser before sending the keystrokes to enter the data.
When using Top-Most Window, ORA will not send Auto Type keystrokes to any instance of the current browser type. If you are using Firefox, for example, and you have two or more Firefox windows open, you cannot use Top-Most Window to send keystrokes to any other Firefox window. To learn how to use Auto Type with another browser window as the target application, please see Auto Type to Browser Window.
Show Current Targets
The [Show Current Targets] button shows the applications running on your PC that are valid targets for the Auto Type facility.
If you want to direct the Auto Type feature to use a specific application, you start the Type Template with {TARGET=appname}. The "appname" parameter should be set to the exact text in the "Target" column of the table displayed by the [Show Current Targets] button.
See the Auto Type page for more details.
Services & Collections
The Services & Collections section of the OraSettings page contains several controls for configuring a service and its collections. A service is the component in ORA that is customized to work with a specific online repository.
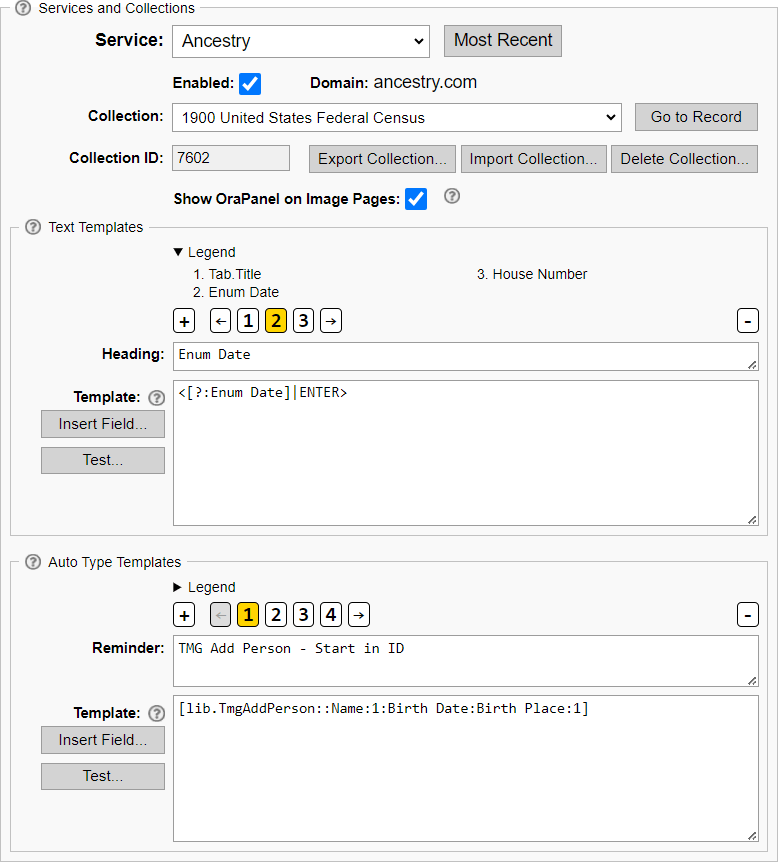
Service
Use the "Service" pull-down menu to choose the service whose properties you want to change. Each repository has an associated service in ORA and the properties of the service customize how ORA processes the repository data.

Most Recent
The [Most Recent] button sets the Service and Collection to the most-recently visited collection and service where an OraPanel appears in another tab.
Enabled
If the Enabled checkbox is checked, the OraPanel will appear for certain pages on the repository web site.

For repositories that use multiple domains, such as "Ancestry.com", "Ancestry.ca", "Ancestry.co.uk", etc., this section will also include a "Domain:" label and the specific domain ORA will use when it constructs URLs to records in the repository.
Collection
Use the Collection pull-down menu to choose the collection whose templates you want to view or edit.
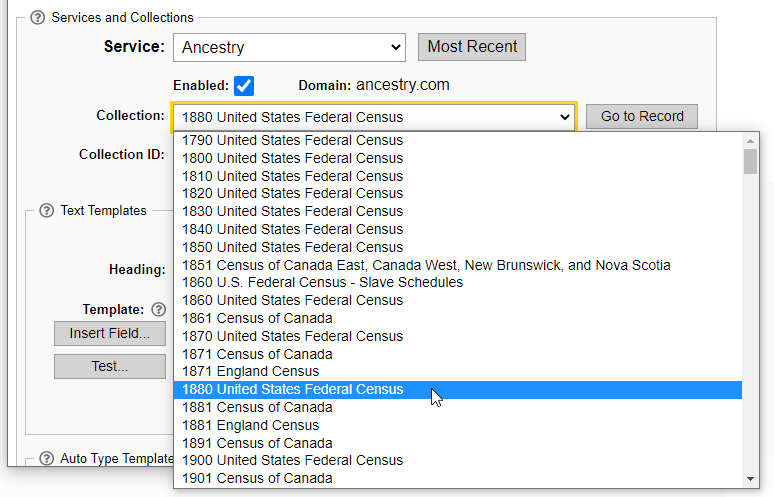
Hint When a repository has many collections, you may find it useful to click the Collection pull-down menu once to open it, then key the first few letters of the collection name to scroll the list to (or near) the collection of interest.
ORA adds collections to the Collection pull-down menu after you visit a record in the collection. So, for example, "1880 United States Federal Census" will not appear in the Collection pull-down menu for Ancestry until you visit at least one record in that collection after you install ORA.
Many repositories include more than one collection. For example, Ancestry.com has thousands of collections. An example is the 1880 United States Federal Census.
Some repositories, including Find a Grave and Newspapers.com, do not separate records into collections. For those repositories, ORA treats records as being in a default collection and only a single choice will appear in the pull-down menu.
Go to Record
Use the [Go to Record] button to open the last record viewed in the current collection using either the Record ID or Page.URL Fields. The page opens in a new tab.

Collection ID
This read-only textbox shows the ID number associated with the current collection. Collection names sometimes change, but Collection IDs usually do not.
Some repositories do not expose stable collection IDs. For those repositories, ORA will generate a Collection ID from the Collection Name.
Export Collection
Use the [Export Collection] button to copy the templates for the current collection.
When you click the [Export Collection] button, you will be prompted to indicate where you want to save the collection's templates.
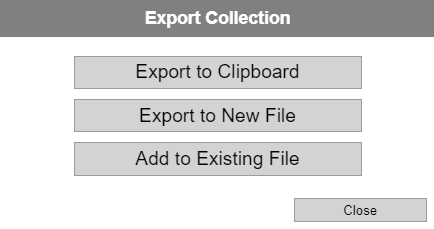
- Choose [Export to Clipboard] and then [Import from Clipboard] to copy the templates from the current collection to another collection.
- Choose [Export to New File] to save the current collection's templates in a new file. Use the file as a backup or to share a single collection with someone else.
- Choose [Export to Existing File] to save the templates for the current collection in an existing file. This adds the current collection's templates to the file. Use the file as a backup or to share multiple collections with someone else.
If you export collection "A" to "file1.ora-collection" using [Export to New File], that file will have one collection in it. However, if you subsequently use the [Export to Existing File] feature and choose "file1.ora-collection", the file will have two collections in it.
Import Collection
Use the [Import Collection] button to import one or more collection templates stored in an external file.
When you click the [Import Collection] button, you will be prompted to choose the source of the collection data.
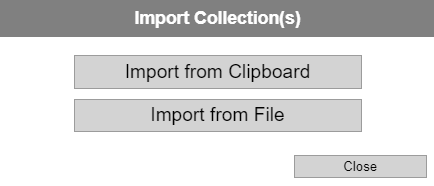
- Choose [Import from Clipboard] to update the current collection with the templates placed on the clipboard by a previous [Export to Clipboard] command.
The current collection's templates will be replaced by the templates from the collection on the clipboard. This combination, [Export to Clipboard], change to a different collection, then [Import from clipboard], is intended to provide users with an easy way to copy the template for collection "A" to collection "B".
- Choose [Import from File] to update the current collection with the templates previously saved to a file.
If the file you choose contains a single collection, you can choose to [Import to Current Collection] or [Import to collection-name] where collection-name will be replaced by the name of the collection that was exported to create the file.
The [Export to New File] and [Import to collection-name] combination is intended to help users share the templates for a single collection. The user who configured the collection exports the collection to a file, then makes the file available to other users. Subsequent users choose [Import to collection-name] to use the templates.
If the file you choose contains multiple collections, the collections will be imported and will add to (or replace) collections in your current database. This is intended for the use case where a user shares a set of collections with other users.
Delete Collection
Use the [Delete Collection...] button to delete the current collection. This deletes your templates (if any), the collection name, and the recent field values used when testing templates.
When you click the [Delete Collection...] button, you will be prompted to confirm that you want to delete the current collection.
Generic Service Options
The following options are only visible when you set the Service to "Generic Service".
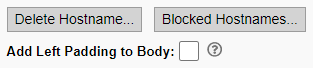
Delete Hostname
The Generic Service supports adding collections that are assigned to generic sites based on the hostname of the site. You add hostnames/collections to the Generic Service using the Add button in the OraPanel. If you accidently add a hostname, or if you do not need the hostname/collection for some other reason, use the [Delete Hostname] button to delete the hostname/collection.
Blocked Hostnames...
The Generic Service uses a block list for generic sites where the OraPanel should not appear. Use the [Blocked Hostnames...] button to view or edit the block list.
Add Left Padding to Body
Use the Add Left Padding to Body with Generic Sites where you want to reserve space for the OraPanel on the left-hand side of the page.
For services like Ancestry, ORA will automatically include CSS to add space. For Generic Service sites, ORA will not automatically reserve space on the left unless there is a tweak for the current hostname. If you'd like ORA to try and reserve space on the left for its OraPanel, set the Add Left Padding to Body to checked.
ORA's method of adding padding may or may not work with the target hostname. If adding padding does not improve the layout, uncheck the option and consider contacting me to request a tweak for the hostname.
Parent Collection
See the Parent Collections page.
Text Templates
See the Text Templates page.
For template-editing instructions, see the Editing Templates section.
Auto Type Templates
See the Auto Type page.
For template-editing instructions, see the Editing Templates section.
Record ID Lookup

The Record ID textbox and [Lookup] button are a convenience feature. They do not modify any ORA preferences or other settings. If you enter a valid record ID for the repository associated with the current service, you can click the [Lookup] button to open the record details page for that record ID.
Template Library

Use the [Edit Templates...] button to add, edit, or delete templates.
Use the [Export Templates...] button to export selected templates to the clipboard or to an external file.
Use the [Import Templates...] button to import selected templates from the clipboard or from an external file.
Use the [Report] button to open a report that shows all templates in the Template Library. The report is an HTML page that will open in the browser assigned to ".html" files, which may or may not be the browser you are using when you click the button.
See the Template Library help page for details.
Template Options
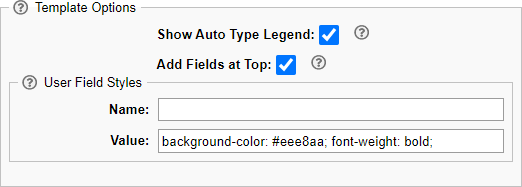
The Template Options section includes several settings that affect Text Templates and Auto Type Templates.
Show Auto Type Legend
Use the Show Auto Type Legend checkbox to enable or disable the OraPanel's Auto Type Legend feature. The default is checked.
- When Show Auto Type Legend is checked, and the current collection has one or more Auto Type templates, ORA will include the legend under the Auto Type buttons.
- When Show Auto Type Legend is not checked, ORA will not include the legend under the Auto Type buttons.
If you change this option, any existing OraPanels on other browser tabs will not reflect the change until you refresh the page. You must refresh the page, not just the OraPanel.
Add Fields at Top
Use the Add Fields at Top checkbox to control whether Fields added via Text Templates are added at the top or the bottom of the OraPanel. The default is unchecked.
- When Add Fields at Top is checked, ORA adds Text Templates Fields to the OraPanel at the top.
- When Add Fields at Top is not checked, ORA adds Text Templates Fields to the OraPanel at the bottom.
If you change this option, any existing OraPanels in other browser tabs will not reflect the change until you refresh the page. You must refresh the page, not just the OraPanel.
User Field Styles
The User Field Styles section includes two text properties that control the appearance of Fields with user-specified values in the OraPanel. OraPanel rows for the following types of Fields will be modified by the style properties in the Name and Value textboxes:
- Fields added via Text Templates.
- Fields added via the Add Field button.
- Fields added via a Persistent Assignment.
- Fields changed by the user editing the Field value.
The Name textbox is for CSS style properties ORA will apply to the name (AKA label) cell in the row. The default is empty and no extra styles are applied to the Field name.
The Value textbox is for CSS style properties ORA will apply to the value cell in the row. The default is "background-color: #eee8aa; font-weight: bold;" which produces a pale Golden Rod background and bold text.

If you change either property, the changes will not apply to any existing OraPanels unless you refresh the page. Refreshing the OraPanel only is not sufficient.
Search Targets
Use the [Search Targets...] button to add, edit, or delete Search Targets.
OraHost
Use the [Open Log File] button to open the current OraHost log file. The file will open in the Windows application configured to open files with the ".log" extension. This command is provided mostly to make it easier to locate the current log file. You may be asked to provide this file if you report an issue. Do not include the file unless requested to do so.
If you do not have an application configured to open ".log" files, MS Windows may prompt you, "How do you want to open this file?" or something similar. Choose a text editor, such as Notepad or a similar program.
For more information, see the OraHost help page.
Date Formats
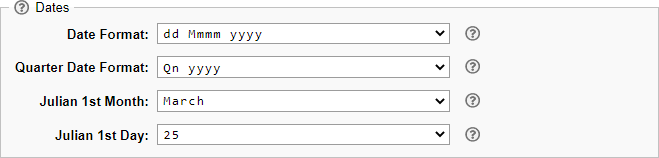
Date Format
Use the Date Format pull-down menu to set the format ORA uses to display dates in the OraPanel. Choose the best format for entering data in your genealogy application. That may or may not be your preferred format for reports or other output.
| Format | Example |
|---|---|
d MMM yyy |
5 AUG 1845 |
dd MMM yyyy |
05 AUG 1845 |
d Mmmm yyy |
5 August 1845 |
d Mmmm yyyy |
5 August 1845 |
dd Mmmm yyyy |
05 August 1845 |
yyyy-mm-dd |
1845-08-05 |
Quarter Date Format
Use the Quarter Date Format pull-down menu to set the format ORA uses to display quarter dates in the OraPanel. Quarter dates are used in some collections, i.e., "Jan-Feb-Mar 1865" or "Q1 1865".
Choose the best format for entering dates in your genealogy application. That may or may not be your preferred format for reports or other output. If your genealogy application does not support quarter dates, but does support date ranges, you should consider using the "BET dd SSS yyyy AND dd EEE yyyy" format.
| Format | Example |
|---|---|
Qn yyyy |
Q1 1865 |
SSS-MMM-EEE yyyy |
JAN-FEB-MAR 1865 |
Sss-Mmm-Eee yyyy |
Jan-Feb-Mar 1865 |
SSS Q yyyy |
JAN Q 1865 |
Sss Q yyyy |
Jan Q 1865 |
SSSS yyyy |
JAN 1865 |
Sss yyyy |
Jan 1865 |
EEE Q yyyy |
MAR Q 1865 |
Eee Q yyyy |
Mar Q 1865 |
EEE yyyy |
MAR 1865 |
Eee yyyy |
Mar 1865 |
BET dd SSS yyyy AND dd EEE yyyy |
BET 01 JAN 1865 AND 31 MAR 1865 |
In the format choices, "SSS" refers to the start month in the quarter and "EEE" refers to the end month in the quarter.
When ORA detects date fields that reflect quarter values, it standardizes the results. For example, when the Record Details include these fields:
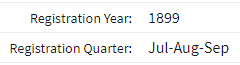
ORA detects the separate year and quarter fields and adds the "Registration Date" field to the OraPanel. The Registration Date includes both the quarter and the year. If the Quarter Date Format preference is set to Qn yyyy, the OraPanel will include these fields and values:

If the Quarter Date Format preference is set to Sss-Mmm-Eee yyyy, the OraPanel will include these fields and values:

The Quarter Date Format value is the format ORA uses when it recognizes that a Field has a quarter date value. If you use the dateQuarter transform, you can supply your own format. Quarter date format codes are described on the that page.
Julian New Year's Day
When ORA converts a date to or from the Julian calendar, it combines the Julian 1st Month and Julian 1st Day properties to create the Julian New Year's Day, the day when the year number is incremented. Set the date to the most common value used in your research, and consider using the dateJNYD transform when processing records from a locale and era that used a different Julian New Year's Day.
For more information, see the Date Related Transforms and the Julian New Year's Day explanation on the Date Manipulation Notes page.
Name Parts Section

The Name Parts Section includes settings that influences the Name Part transforms.
Name Prefixes
Use the [Name Prefixes...] button to view or edit the values in the Name Prefixes list. See the namePrefix transform for more information.
Name PreSurnames
Use the [Name PreSurnames...] button to view or edit the values in the Name PreSurnames list. See the nameSurname transform for more information.
Name Suffixes
Use the [Name Suffixes...] button to view or edit the values in the Name Sufixes list. See the nameSuffixes transform for more information.
Optional Name Part Characters
Certain characters in the default entries of the Name Prefixes, Name PreSurnames, and Name Suffixes lists are optional. They are included if Optional Name Part Characters is checked, and they are omitted if Optional Name Part Characters is unchecked. The optional characters are delimited by [ and ] in the values.
This feature is intended to help users switch between the US and UK conventions regarding periods following abbreviations:
- Set Optional Name Part Characters to checked to follow the convention used in the United States where abbreviations are followed by a period.
- Set Optional Name Part Characters to unchecked to follow the convention used in the United Kingdom where some abbreviations are followed by a period and some are not.
In the list entries, if the value includes "[.]", the period inside [ and ] will be included in the transformed name part when Optional Name Part Characters is checked, and omitted otherwise.
The list entries supplied by default in ORA use the Optional Name Part Characters feature to include or omit periods only, but you may use the feature to include or omit other characters.
Places

The Places Section includes settings that influences the Place transforms.
Default Locale
Use the Default Locale pull-down menu to choose a default locale for ORA's place parser. The menu includes several country names that represent locales for which ORA has a customized version of its place parser. The Default Locale determines which place parser is used when ORA cannot determine the locale from the place value itself.
ORA chooses the initial value for the Default Locale based on your browser's language setting. That may or may not be the correct choice. Set the Default Locale to suit your preference.
See Place Locales.
Editing Templates
There are two template-editing sections, one for Text Templates and one for Auto Type Templates.
Each section has the same controls:
- Legend
- Add Template ([+])
- Move Template Left ([←])
- Choose Template ([1], [2], etc.)
- Move Template Right ([→])
- Delete Template ([-])
- Heading for Text Templates, or Reminder for Auto Type Templates
- Template TextBox
- Insert Field... Button
- Test... Button
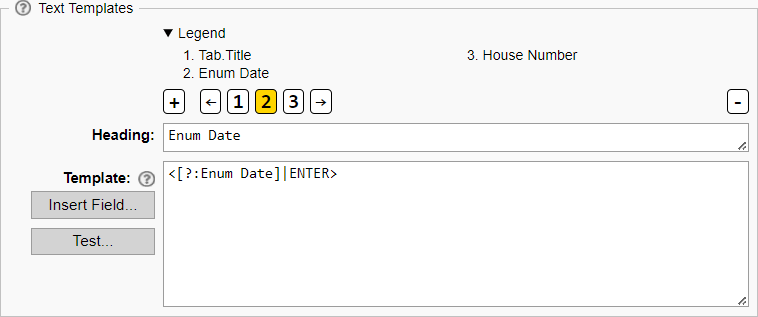
Legend

The Legend is a list of the template Headings (Text Templates) or Reminders (Auto Type Templates). You may expand or collapse the list using the arrow.
If there is only one template or less, the Legend is omitted.
Add Template

Use the Add Template button to add a new template. The Add Template button will create a new template with empty values. Text Templates create text that is added to the OraPanel. Auto Type Templates create buttons in the Auto Type section at the top of the OraPanel. Clicking an Auto Type button sends text to your genealogy application.
If you hold the Alt key when clicking the Add Template button, the new template will be inserted before the currently highlighted Choose Template button. This renumbers the existing templates starting with the highlighted template.
If you do not hold the Alt key when clicking the Add Template button, the new template will be added using the next available template number.
Move Template Left
Use the Move Template Left button to move the current template to the left. For example, if the current template is #2, and you click the left arrow, the current template will become #1, and #1 will become #2.
Choose Template
After you add a template, a numbered button will appear to the right of the Add Template [+] button. You can edit the text for the template after clicking the Add Template button. To edit an existing template, click one of the Choose Template buttons.
When you click one of the Choose Template buttons, that button will be highlighted and the Template textbox will contain the current text of the template.
Move Template Right
Use the Move Template Right button to move the current template to the right. For example, if the current template is #2, and you click the right arrow, the current template will become #3, and #3 will become #2.
Delete Template
Use the Delete Template button to delete the current (highlighted) template.
Heading
The Heading text is used with Text Templates. The Heading text is used as the field label for the template output in the OraPanel.

Reminder
The Reminder text is used with Auto Type Templates. The Reminder text is used as the tooltip for the template's Auto Type button in the OraPanel. If you hover your mouse over the button, you will see the tooltip / reminder.

Template TextBox
Key the template text in the Template textbox.
For more information about templates, see Text Templates or Auto Type Templates.
Insert Field... Button
The [Insert Field...] button opens a dialog panel with several choices for inserting variable references into the textbox of the associated template (Text or Auto Type).

Select a field from the pull-down menu and click one of the buttons:
- Insert – Inserts an unconditional variable reference. If the field is "Name", clicking this button will insert
[Name]. - Insert (conditional) – Inserts a conditional variable reference. If the field is "Name", clicking this button will insert
<, [Name]>. - Insert (conditional with name) – Inserts a conditional variable reference that includes the field name as a label. If the field is "Name", clicking this button will insert
<, Name: [Name]>. - Insert (name only) – Inserts the field name. If the field is "Name", clicking this button will insert
Name.
When you click one of the buttons listed above, ORA inserts a variable reference for that field into the associated template at the cursor location. Click one or more of the buttons until you have inserted the field(s) you want, then click the [Close] button.
If you select "<all>" in the pull-down menu, ORA will repeat the insert operation for all the fields in the pull-down menu. This is intended as an easy way to get all the fields into the template. After inserting all fields, edit the template to remove the fields you don't need, change the sequence, etc.
Test... Button
The [Test...] button evaluates the current template using field values saved from the last visit to a record in the current collection. The [Test...] button opens a panel that shows the text output from evaluating the template.
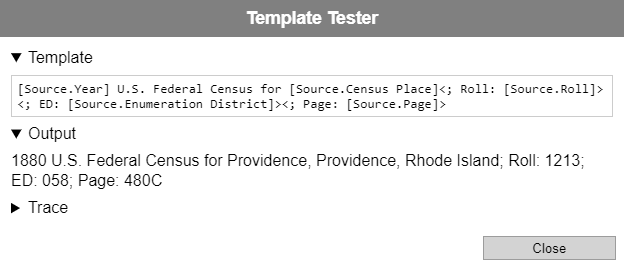
The template appears under the Template header.
The result of evaluating the template appears under the Output header.
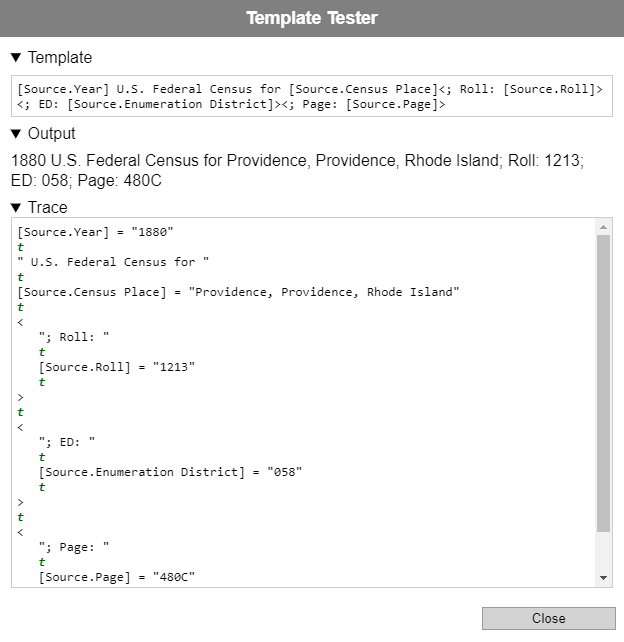
Click "Trace" to expand the panel to include a trace of the evaluation of the template. The trace shows the logic and true/false results processed during the template evaluation. The entries are indented to show the nesting of conditional expressions. If your template does not produce the output you expect, the trace may help you determine why.
Example Trace Output
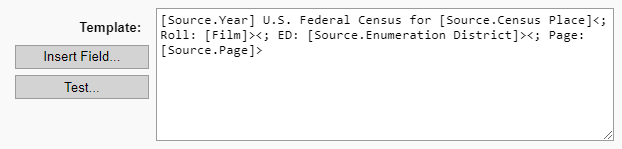
The template:
[Source.Year] U.S. Federal Census for [Source.Census Place]<; Roll: [Source.Roll]><; ED: [Source.Enumeration District]><; Page: [Source.Page]>
The output:
1880 U.S. Federal Census for Providence, Providence, Rhode Island; Roll: 1213; ED: 058; Page: 480C
The trace:
[Source.Year] = "1880"
T
" U.S. Federal Census for "
T
[Source.Census Place] = "Providence, Providence, Rhode Island"
T
<
   "; Roll: "
   T
   [Source.Roll] = "1213"
   T
>
T
<
   "; ED: "
   T
   [Source.Enumeration District] = "058"
   T
>
T
<
   "; Page: "
   T
   [Source.Page] = "480C"
   T
>
T
In the trace, each expression is followed by T or F indicating "true" or "false", respectively. The output of a false expression is not inserted into the output.
Special Text Templates
Some Text Templates have a special purpose determined by their name. See Special Text Templates.